Gorgeous Easy Eyes With New York Color! Review, Swatches, and Looks

While I love my makeup brushes, I always hate having so many different brushes for the different types of makeup I have. Which is why some of my favorites of my collection have built in brushes. However, I can never find a good pigmented eye shadow with an applicator built in.
NYC New York Color makes Sparkle Eye Dust in a container similar to a tube of lip gloss. At first I thought that being in this type of container would make this eye shadow hard to apply, but to my surprise it has made application so much easier! I was even able to apply this shadow on my toddler (she is a girly girl!) without any problems! She always is the first to try out the new products in Mommy’s boxes, most of the time she’s the first to the door when we get new ones!

Little H sporting Amethyst Dazzle

At the price tag of $2.99 at most retailers I was not expecting this shadow to be very pigmented or really very pretty at all. There has only been one other cheap company that I have fallen in love with, but their product quality can be hit or miss. I was very surprised to see how pretty and colorful these shadows are! The only issue I have found is that they do have a lot of fall-out but if you are careful and you tap the end over the bottle before application you will be fine.

I decided to put this eye shadow to the test and wear it at my daughters 3rd Birthday. I was very happy with how well this shadow stayed on, it even lasted as long as my $45 eye shadow! Here is the look I went with for this shadow:

What’s even more surprising is that these pictures were taken after I had gotten home from the party! I could not believe how vibrant the color was after such a long hot day! I really enjoyed this shadow, and for the price I think you will too!

You can find NYC New York Color’s Sparkle Eye Dust on their website here, or at a retailer near you!

**Disclaimer** I was in no way paid, or obligated to give a positive review, or a review at all for this company. If you would like to read my full disclaimer for reviews you can find it here .

Share Button

Glamour Look by Mary Kay: Review and Looks

I have reviewed boxes for you guys from Influenster before and recently I received a new box that I am very excited to share with you! I received the Glamour Look by Mary Kay VoxBox. This is what was inside:
This box came with so many great things! I was so excited to be able to try them out and share them with you!
Lash Primer
I loved this lash primer, but I mainly loved the brush. I have never seen anything like it! I loved that it separated my lashes and unlike mascara it doesn’t clump during the process. It goes on clear and dries an opaque white. I have never used a primer before, so I was extra excited to try this product! I was very impressed and will be using this primer from now on!

Lash Love Lengthening Mascara
Of course I had to use the Lash Love Lengthening Mascara and the brush is pretty cool on this one too. I love the curve as it helps curl my lashes without the extra curler. I hate having a bunch of unnecessary makeup tools when one product can do multiple tasks. This mascara went on clump free (I’m sure with help from the primer) and stayed on all night! The first time I used it was for my husbands birthday trip in Reno, NV and I was out until about 6am and when I came back to the room it was still in tact. Normally after that long my lashes begin to look a little funny, but with this mascara they looked like I had just applied it.

Cream Eye Color in Violet Storm
I was very excited to use the Cream Eye Color. For one it is purple (my go-to eye color) and two it looking like it would be super simple to apple (which it was). I can’t really say that I was disappointed with this product, but it is definitely not my favorite of the bunch. While it went on smooth, I had a hard time trying to blend it with any other product. As it is only one color I wanted to add more but every attempt was worse than the one before it. I did love the color, and will use it again. Another issue that I had is that it creased really easily. Hopefully I can find a way to keep it from creasing because it is one of my favorite colors of my collection, I just wish it was my favorite product.

True Dimensions Lipstick in Pink Cherie
I don’t normally wear lipstick, but I do enjoy having a pretty color for when I do want to change things up a bit. I fell in love with this color the moment I saw it! It blends perfectly with my skin tone and goes on incredibly smooth. The container was a little confusing at first, although now that I am used to it I really like it. Since having this lipstick I have worn it almost everyday. Like I said before, I don’t wear lipstick very often so that is saying something about this product!

Cream Eye Color/Concealer Brush
Lastly I received this makeup brush. I LOVE it! I only have a couple of brushes in my collection but I only keep the ones worth while. Because of this brush, I have thrown out my old concealer brush. This on is firm, yet extremely soft. It is now one of my new favorite brushes!

Here is the look I created using these products:

I loved these products and I can’t wait to try more Mary Kay products! So far they all seem great!

You can find Mary Kay and their wonderful products on their website here.

**Disclaimer: I received these products complimentary from Influenster for testing purposes.**

Share Button

Stand Out Nails With Sally Hansen Insta-Gel! Review and Swatches

As you all know I absolutely love Gel nails and I love creating designs with my gel polish. Not all of us can create free-hand designs on our nails, let alone have them all match. So how do you get perfectly designed Gel nails without paying a fortune at the salon?
With the Sally Hansen Salon Insta-Gel Starter kit! I love that this kit is so easy to use! Unlike other gel systems this kit only has really only 2 steps to get a beautiful manicure that all your friends will be jealous of! Each kit comes with a mini LED lamp, Gel cleansing cloths, 16 Gel polish strips, Gel top coat, a file, and a manicure stick. The starter kit comes in 3 different colors: Red My Lips (red), Wine Not ( shimmery dark red), and Shell We Dance (light pink).
This kit is super easy to use! First you lightly buff your natural nail, but make sure to LIGHTLY buff your nail otherwise you can damage it. Then you wipe your nails with the gel cleanser (I like to go over each nail twice to make sure that they are completely clean). Next you take the strips out of the package and stick them on your nails according to size ( I find this to be the hardest part because of the shape of my nails). After that you add the top coat over the stickers and cure under the LED light for 30 seconds. Last but not least, use the last cleanser wipe and remove the tacky layer off the top. Viola! You now have salon quality gel nails at home!

If you are like me and the colors available in the kit are not your style they have lots of other colors and even pre-made designs! So of course that’s where I run to! I received 3 different strips, two of which I am going to show you in this review (the other I’m sure you will see soon!).

First up is Pretty ‘N Poppy.

One of the main reasons I love the Insta-Gel kit is that you get everything you need when you buy a new polish. You don’t need to constantly buy refill kits of the necessities which can be very pricey after a while. In every kit there are 16 nail strips, Gel cleansing wipes, Top coat, a nail file, and manicure stick. Sound familiar? It’s pretty much everything included in the original kit but the LED lamp!

I was very surprised with how easy they are to put on! With other Gel kits it can take forever to do each layer, but this was simple and fast! After some bad experiences with nail strips I half expected these to turn out horrible, but they turned out perfect!

In the light

Indoors

I love how shiny they are, and I love how easy it was to get a perfect design! I have spent hours before painting my nails with Gel polish so I was very happy with my results! On the box it says to put one coat of top coat, but for these pictures I put 2 coats. I like my nails a little thicker so that they don’t break so I added 2 more coats later on.

Next I decided to use the Amazing Lace Nail Strips. I absolutely love the way these ones turned out. They have a gold color for the base and a realistic black lace design on top.

Outside
Indoors

This is one design that I have been wanting to do for a long time! I have seen some simple lace designs that I thought might be easy enough, but I just don’t think I have the patience to do a free hand lace design without messing it up. So I was very excited when I saw this product.

Tips for using Sally Hansen Insta-Gel Strips

  • LIGHTLY buff your nails! You want to make sure you get the whole surface area of your nail, but if you are too rough or file too much you can ruin your nail.
  • Make sure to clean your nails with the cleanser, like I said earlier I like to do this twice to make sure they are clean.
  • Stretch the strips to the end of your nail and then file off. This way the strip is stuck to your nail. If it is not stuck to the tip of your nail it will peel off.
  • Make sure to keep the clear polish off the edges and cuticles of your fingers. If you get the polish on your skin it will cause lifting of your nails.
  • The clear coat is pretty thin so make sure you go slowly and take your time putting the clear coat on so that you don’t get any on your skin.
The only thing I did not LOVE in this kit, was the LED Lamp. While it worked great I do wish it was a little bigger. It did have it’s upside though, because of it’s shape it was very easy to hold and it is also very easy to travel with. Other LED Lamps can be big and bulky and hard to find room for.

I highly recommend this product to anyone looking for salon quality nail designs that you can do at home! I loved the way these nails turned out and I loved how easy they were to apply!

You can find Sally Hansen Insta-Gel Products on their website here, or at you local retailer!

What do you think of these products? Let us know in the comments below!

**Disclaimer** I was in no way paid, or obligated to give a positive review, or a review at all for this company. If you would like to read my full disclaimer for reviews you can find it here .

Share Button

Everything’s Better Sugar Coated! Nail Swatches and Review

One of the most popular nail trends recently has been textured nails. I have seen just about everything from furry nails, bumpy nails, nails with little balls glued to them, and of course matte nails. While some of them I are amazing, others (like furry nails) I still have not learned to love. I received some really awesome polish from Sally Hansen that they call Sugar Coat.
When I first heard of the textured polish craze I thought I would freak out if I had nails with texture! I hate it when there is a flaw in my nails, so the thought of every nail having “flaws” on them just did not seem like a fun idea. After trying them I realized that the pictures make the texture look a little more rough than they really are. I find textured polish to be tolerable and have started to like certain ones. I was pretty excited to try Sally Hansen’s Sugar Coat Line, and I am proud to tell you that they did not disappoint!
I was sent two colors to review for you guys: Cotton Candies and Bubble Plum. I think that the Cotton Candies color is my favorite of the two!
Bubble Plum and Cotton Candies with Cotton Candies bottle

Bubble Plum and Cotton Candies with Bubble Plum Bottle
They really do look like someone poured sugar into the bottle, but that are not sharp even though they look it. I was very surprised with how fast they dried! I was expecting this polish to take forever, but I was even able to paint my two year old’s nails with it! By the time she got up it was already dry! With most polish it ends up getting smeared or smudged because she doesn’t like to sit still long enough for it to dry. Mainly because she likes to go show them off!

In the light

Indoors
Because of my experience with the last Sally Hansen polish I thought that I was going to need at least 3 coats with this one, but to my surprise I only needed 2 coats and they were perfect! The polish glided surprisingly easy, and was the consistency of a slightly watery polish, but as it dried you could see the texture popping up.
For this review I just did a regular manicure because I was excited about my next review of the Sally Hansen Insta-Gel System, but next time you see these I will attempt at a texture color blocking design. I have see it done a couple times and I think they look pretty awesome! You can see what I’m talking about on the Pinterest post here. Be sure to follow us on Pinterest to see all of out designs, as well as all of the cool designs we find along the way!
If you have not tried a texture polish I highly suggest you do! I thought I would hate them, but it is one of those love/hate relationships. Not only that but the colors in this line are absolutely gorgeous!
You can find the Sugar Coat line on Sally Hansen’s Website here.
**Disclaimer** I was in no way paid, or obligated to give a positive review, or a review at all for this company. If you would like to read my full disclaimer for reviews you can find it here .
Share Button

Fall in love with Gem Crush Nails- Swatches and Review

I LOVE sparkles! Especially when it comes to my nails! I always find it hard to find the right polish color that has the right amount of sparkle. I finally found a polish that has tons of sparkle and also comes in lots of gorgeous colors!

This is Gem Crush by Sally Hansen. There are 8 full coverage glitter polishes in the collection and consist of two different shapes, sizes and colors. I was really impressed with how easy they were to apply! I hate glitter polish that takes 10 coats to get anywhere with and that doesn’t have very much dimension.

I received Glitz Gal and Be-Jeweled to review for you guys and I am happy to report that they are amazing! I decided to do all nails but my ring finger with Be-Jeweled and my ring finger has Glitz Gal for an accent. I don’t know why but I really like to have at least one thing different on my manicures!

Glitz Gal bottle

Be-Jeweled bottle

The bottle itself says to add 2 coats, but for these pictures I added 3 coats to get complete coverage on my nails. I was really impressed by how fast it dried considering how thick the polish itself was. The polish glides on really well for how thick it is! My nails are generally pretty flimsy so I like having polish that is a little thicker than normal. Just so that not only do my nails have a little extra cushion from breaks, but so that they are less likely to peel right off.

In the sun :)

Inside

Gem Crush is now my go-to glitter line, and I am very happy I was able to try them! If you get the chance I would highly recommend them to anyone who likes glitter, or looking for a full coverage, long lasting polish.

You can Find Sally Hansen and their Gem Crush Polish here.

Check out the ad for Gem Crush!

**Disclaimer** I was in no way paid, or obligated to give a positive review, or a review at all for this company. If you would like to read my full disclaimer for reviews you can find it here .
Share Button

Matte Gel Nails Tutorial

So you all know of my Senstionail obsession, if not you do now! Anyway, for the longest time I have wanted to try a matte finish nail polish but did not want to give up on my Sensationail nails. So I have solved this problem by figuring out how to get a matte finish using one Sensationail products!
So this is the design I chose. I also added some clear polish on the top to create a cool design. But enough of that, lets get to the good stuff! Here is my tutorial:
To elaborate a little further, in case the picture above is a little confusing.
Step 1: paint your nails like you would normally. You can choose any design or any color you would like and it’s not the color that produces the matte finish. I decided to do a pink gradient.
Step 2: Make sure to add an extra coat of clear. We do this because you don’t want to lose any of your color when doing step 3.
Step 3: Take the softer end of a nail file and gently buff your entire nail. You don’t want any shine showing otherwise you will lose the matte effect. Make sure you cleanse your nail with the gel cleaner afterwords.
Step 4: If you would like you can add a design on top of your nail like I did to create a 2 dimensional look. All you do is take your clear coat either using a toothpick or any other nail tool you would like and draw your design. You could also just paint the tips for a french manicure look. Remove the tacky layer with your gel cleanser and viola! You have a Matte Gel Nail Design !
Let us know if you tried this and be sure to post pictures letting us know your results! We love seeing new designs!
Share Button

Ellie Workout Clothing

I know I am not generally the one that you will find exercising every day, but this is something I have been trying to change. I have decided that I have been lazy for far too long when it comes to my health. Now that my girls are a little older it is a little easier to get away for a minute to get some much needed exercise time in.

Before finding out about Ellie I would have a hard time working out in public, or even in my own home! Not only because I felt weak compared to the others around me but also because of what I was wearing. Sure for some I’m sure this could be a form of motivation, but for me it’s just another way to tear me down. How am I supposed to lose weight if I don’t even feel comfortable in the outfit I am wearing?

This is the exact reason why I am so in love with Ellie! They strive to make us look great so that we feel the motivation to look even better! I promise I am not completely naive, I do realize that working out is not the most glamorous process. Of course you are still going to sweat and look exhausted (because generally you will be) but that’s no reason to look worse with an ugly, uncomfortable outfit that you don’t want to be seen in even if you are not working out. I received the Double Threat Tank and the Double Decker Capri to review and I can honestly say that this is by far the best workout outfit that I have ever owned!

The Double threat tank has a built-in-bra that I was very surprised to learn that it actually fit me! I am a 36DDD and it is very hard to find anything that will not only fit my midsection, but will also fit my chest. While it may not be as supportive as a regular bra it is still great compared to similar shelf bras. I love the way this top is designed! It looks like two pieces but is really one. I also love the grey and coral color combo.

The Double Decker Capris are also wonderful! They have a wide waist band that can be worn two different ways. You can wear it up so that it is just the coral color at the waist, or you pull it down so that it is grey at the top and coral at the bottom. They are super soft and stretch pretty far, I was worried that they would feel too tight but they not feel like they felt amazing once they were on.

Waist Band Folded Down
Waist Band Pulled Up

Both pieces are made with flat seems that prevent chafing, and has a four-way stretch that moves with you. I find this part super important because otherwise you will be tugging and pulling on your outfit during your workout which can be completely annoying. Once I had this outfit on I didn’t have to adjust anything throughout my workout which was very important to me! They also have moisture wicking to help keep your clothes dry when you work up a sweat. I love that I don’t have to worry about nasty sweat stains showing anymore!

I love all the tops that Ellie has to offer! It was EXTREMELY hard to pick just one top. I have never seen another company with designs like Ellie’s and I am so glad that they design the tops so that everyone can look great in them! Another great thing about Ellie is that they are always coming up with new designs, and they even offer a subscription program! Yes, that’s right! You can always have the latest and greatest workout gear delivered to you for a great price! You can get two pieces from their collection for $49.95 a month! Of course you can buy each piece separately as well.

As I’m sure you have heard from previous posts, you can get 20% off your purchase from Ellie just by clicking this link. So what are you waiting for?

Want to look good and feel great? Save 20% on Ellie.com.

**Disclaimer** I was in no way paid, or obligated to give a positive review, or a review at all for this company. If you would like to read my full disclaimer for reviews you can find it here .

Share Button

Instead Soft Cup Review

Why hello there!
I know that I have been MIA lately, and I apologize. Between school, my little princesses (when they want to be), and everything else life has been throwing at me I took out the one thing I had control over. Well school is coming to an end, and with the current weather I have been going stir crazy and need to give myself something to do again. This time I plan on taking things a little slower and making sure that I get you the best reviews possible and have enough time to complete each one. With that being said I will start off with a review of a product that I bought myself and fell in love with!
Now before you start reading I am going to warn you that this post is mainly for our female viewers, and is not for the faint of heart. This post is about a product that women can use when their Aunt Flow comes to visit, so I’m sure you get the idea.

Since having my babies I have been looking for a better way to take care of my monthly visitor, I have tried different brands of tampons with no luck. My flow is very irregular and I have a major problem finding products that will last longer than an hour during the first few days of my period. A couple months ago while in school I had a HUGE leak, something that has not happened to me since high school. I was mortified and became determined to find something to fix my problems and give me piece of mind when I am out and about.

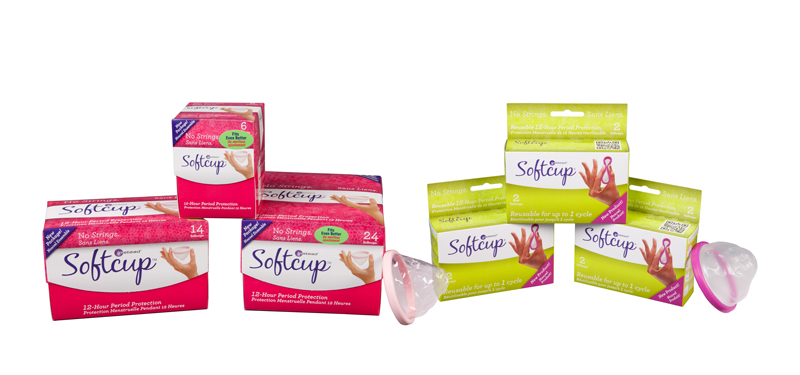
The product I found will not only save you time, but will save you money as well. This magical product that I keep going on and on about is called a Soft Cup. Soft Cup is a small flexible cup that fits around your cervix. Unlike tampons that absorb and can cause TSS, the Soft Cup collects your menstrual flow. When I first heard of this product my first thoughts were not all that pretty, but after my recent “accident” I decided enough was enough and that I should just give it a shot.
Soft cup is not only more eco-friendly than traditional tampons or pads, but like I mentioned earlier using it does not lead to things like Toxic Shock Syndrome because it does not have the germ harboring fibers that other products contain. Also they are more comfortable than a tampon because they do not make you feel dry on light days, and hold more on your heavy days (up to 12 hours of wear) and they have both disposable and reusable versions. Here’s the kicker, you can also wear Soft Cup during sex! What other product lets you do that?
Okay, so now that you have heard some of the good stuff about what this product is capable of, does it really work? Yes! While mine typically do not last a full 12 hours (my periods are extremely heavy for the first few days), it does last significantly longer than a tampon. The way Soft Cup explains how long it will last for an individual is that it will typically last twice as long as a tampon if not longer. Mine will last about 3-4 hours on a bad day and up to 10 on a good day. Even if I do not get 12 hours out of each one I am still saving money and saving the land fill.
Soft Cup is very easy to use, and can be a little messy the first few times you use it, but once you get the hang of it they truly are little life savers. You can find out more about how to use Soft Cup here. Since using Soft Cup I have noticed significantly less cramps, and an overall feeling of security that I won’t leak everywhere I go, and it doesn’t take up very much room in my purse.
So you want to try before you buy? Well Soft Cup is a wonderful company and knows that you will love their products so they offer a sample pack of two Soft Cups and great information about their product for only $2.50 shipped! You can get this great offer on their website here.
I love this product and if it’s something you are willing to try I’m sure it is something you will love as well! Make sure to stay tuned for plenty more reviews! Thank you for staying with us!
**Disclaimer** I was in no way paid, or obligated to give a positive review, or a review at all for this company. If you would like to read my full disclaimer for reviews you can find it here .
Share Button

Lily Bug Pretend Makeup Review and Giveaway

I cannot tell you how many times I have been trying to put on my makeup only to realize that my daughter took off with some of it and is in the other room applying it to her own face. While this is extremely cute it is also extremely messy. I have been on the lookout for makeup kits for my toddler that are both safe for her, and mess free. On this search I found Lily Bug Pretend Makeup, and just in time for Valentines Day!
I received their 6 piece Necessities set to review, or well my girls got to review this one! :)
Necessity Set (6pcs)
I could tell immediately that my girls were going to love their pretend makeup! When I first saw them I thought they were like a shadow that just didn’t leave any marks, but as I looked closer I realized that it was actually similar to a fabric. I love that it looks just like my makeup but doesn’t make a mess. Most makeup sets still contain some dyes that may not leave marks on skin, but are hard to clean off of the carpet. Or they may be a light color, but are in powder form and can get everywhere! So I was very happy that I won’t be dealing with either of these problems with this set.

My girls really loved playing with this set. Now I have something to give them while I do my own makeup and I wont have to worry about them making a mess with my makeup or their own. It keeps them occupied and keeps mommy happy. Another thing that is great about Lily Bug makeup is that it is 100% Non-Toxic and Lead Free.

Make sure to check out all the wonderful products Lily Bug Pretend Makeup has to offer!

Want to win a set for your princess? Make sure to enter our giveaway below!

Loading Entry-Form…

**Disclaimer** I was in no way paid, or obligated to give a positive review, or a review at all for this company. If you would like to read my full disclaimer for reviews you can find it here .
Share Button

Mally Beauty Review

Mally Beauty
One of the things I love to review most is makeup. I used to think that pretty much all makeup was the same until I started blogging and was introduced to the makeup world. I still don’t think I will ever spend $100 on a foundation, but I have learned that really cheap makeup can be really cheap. Paying a little bit more for makeup generally gives you a much better product that not only looks much better, but lasts a lot longer too! Sure some are the exception to this rule but most aren’t. So I am always happy to share with you guys the makeup that I find that may not be the cheapest out there, but is inexpensive and totally worth it! I believe Mally Beauty products are one of those brands that is totally worth it!
I was able to receive their City Chick Smokey Eye Kit in “Plum Chelsea,” Age Rebel Shadow Stick Duo in “Smokey Quarts/Emerald,” and their Ginormous Mascara. I was so happy that all the colors blend together perfectly so I could create tons of new looks from just a couple products.

My absolute favorite of the bunch was the Smokey Eye Kit. Of course it was in purple, which makes me love it that much more! The kit comes with three different shades of eye shadow, eyeliner, and it even comes with a built in primer! I love that it comes with its own primer so that I don’t have to carry an extra thing along with it. Especially lately I have been very picky about my eye makeup. For me my favorites in my collection are very pigmented, have at least some shimmer or sparkle, and must last longer than 5 minutes. Anything that does not stay put either gets thrown out or given to someone else. I am proud to report that this shadow has all three!

From their stock photo you can’t really see how great the shadows are. It doesn’t show them sparkle, I know you guys want to see the sparkles so I took some closer pictures with my own camera to share with you.

I also took some swatches for you guys to see!

I was really surprised with how soft the shadows were, and how easy they were to apply. I also love how shimmery the shadows are. The eyeliner went on really smooth, and is easily used for a more sultry look as it is not the darkest over the shadow (you can see more of what I am talking about at the end of the review when I show you the look I created). The liner stick itself is very thin so it makes it easy to apply thin lines.

My second favorite product would have to be the Shadow Sticks.

Mally Age Rebel Waterproof Shadow Stick Duo

Like the shadows they are very shimmery.

I was really worried that they would look funky or apply chalky like a white shadow stick I have from another company but they glided onto my skin and looked great too!

At first I thought that I would hate the Emerald. Not because of the product, but because I am not a fan of green. I actually really love this green, and I love to use the both of them with other colors and products. They are great for blending and they look great! What I love most about them is that they not only stay on for a long time (mine stayed on overnight when I forgot to take my makeup off) but they do not crease or leave funny lines. I love to use these when I want to wear makeup but don’t have time to do a lot.

Last but not least is the Ginormous Mascara.

I absolutely LOVE the brush for this mascara. It works wonders for my lashes!

I love how it separates each lash, and that it doesn’t leave clumps behind. My only issue with this mascara is that it’s not waterproof. My eyes tend to water a lot so by the end of the day my mascara is ruined. Even so, it does last longer than most non-waterproof mascaras and I still love to wear it because it still makes my lashes look amazing! Hopefully they will make a waterproof version later on!

I love these products, and I love how versatile they are. I can wear the colors with just about anything for any occasion. Not only that but the colors do not fade which is a real plus! I will definitely be ordering more Mally Beauty products, especially more shadow sticks! They are truly amazing!

Here is the look I made using my new Mally Beauty products!

You can find Mally Beauty on their website here, or you can check them out on QVC.

Have you used Mally Beauty products before? Let us know your favorite in the comments below! :)

**Disclaimer** I was in no way paid, or obligated to give a positive review, or a review at all for this company. If you would like to read my full disclaimer for reviews you can find it here .
Share Button