Stand Out Nails With Sally Hansen Insta-Gel! Review and Swatches

As you all know I absolutely love Gel nails and I love creating designs with my gel polish. Not all of us can create free-hand designs on our nails, let alone have them all match. So how do you get perfectly designed Gel nails without paying a fortune at the salon?
With the Sally Hansen Salon Insta-Gel Starter kit! I love that this kit is so easy to use! Unlike other gel systems this kit only has really only 2 steps to get a beautiful manicure that all your friends will be jealous of! Each kit comes with a mini LED lamp, Gel cleansing cloths, 16 Gel polish strips, Gel top coat, a file, and a manicure stick. The starter kit comes in 3 different colors: Red My Lips (red), Wine Not ( shimmery dark red), and Shell We Dance (light pink).
This kit is super easy to use! First you lightly buff your natural nail, but make sure to LIGHTLY buff your nail otherwise you can damage it. Then you wipe your nails with the gel cleanser (I like to go over each nail twice to make sure that they are completely clean). Next you take the strips out of the package and stick them on your nails according to size ( I find this to be the hardest part because of the shape of my nails). After that you add the top coat over the stickers and cure under the LED light for 30 seconds. Last but not least, use the last cleanser wipe and remove the tacky layer off the top. Viola! You now have salon quality gel nails at home!

If you are like me and the colors available in the kit are not your style they have lots of other colors and even pre-made designs! So of course that’s where I run to! I received 3 different strips, two of which I am going to show you in this review (the other I’m sure you will see soon!).

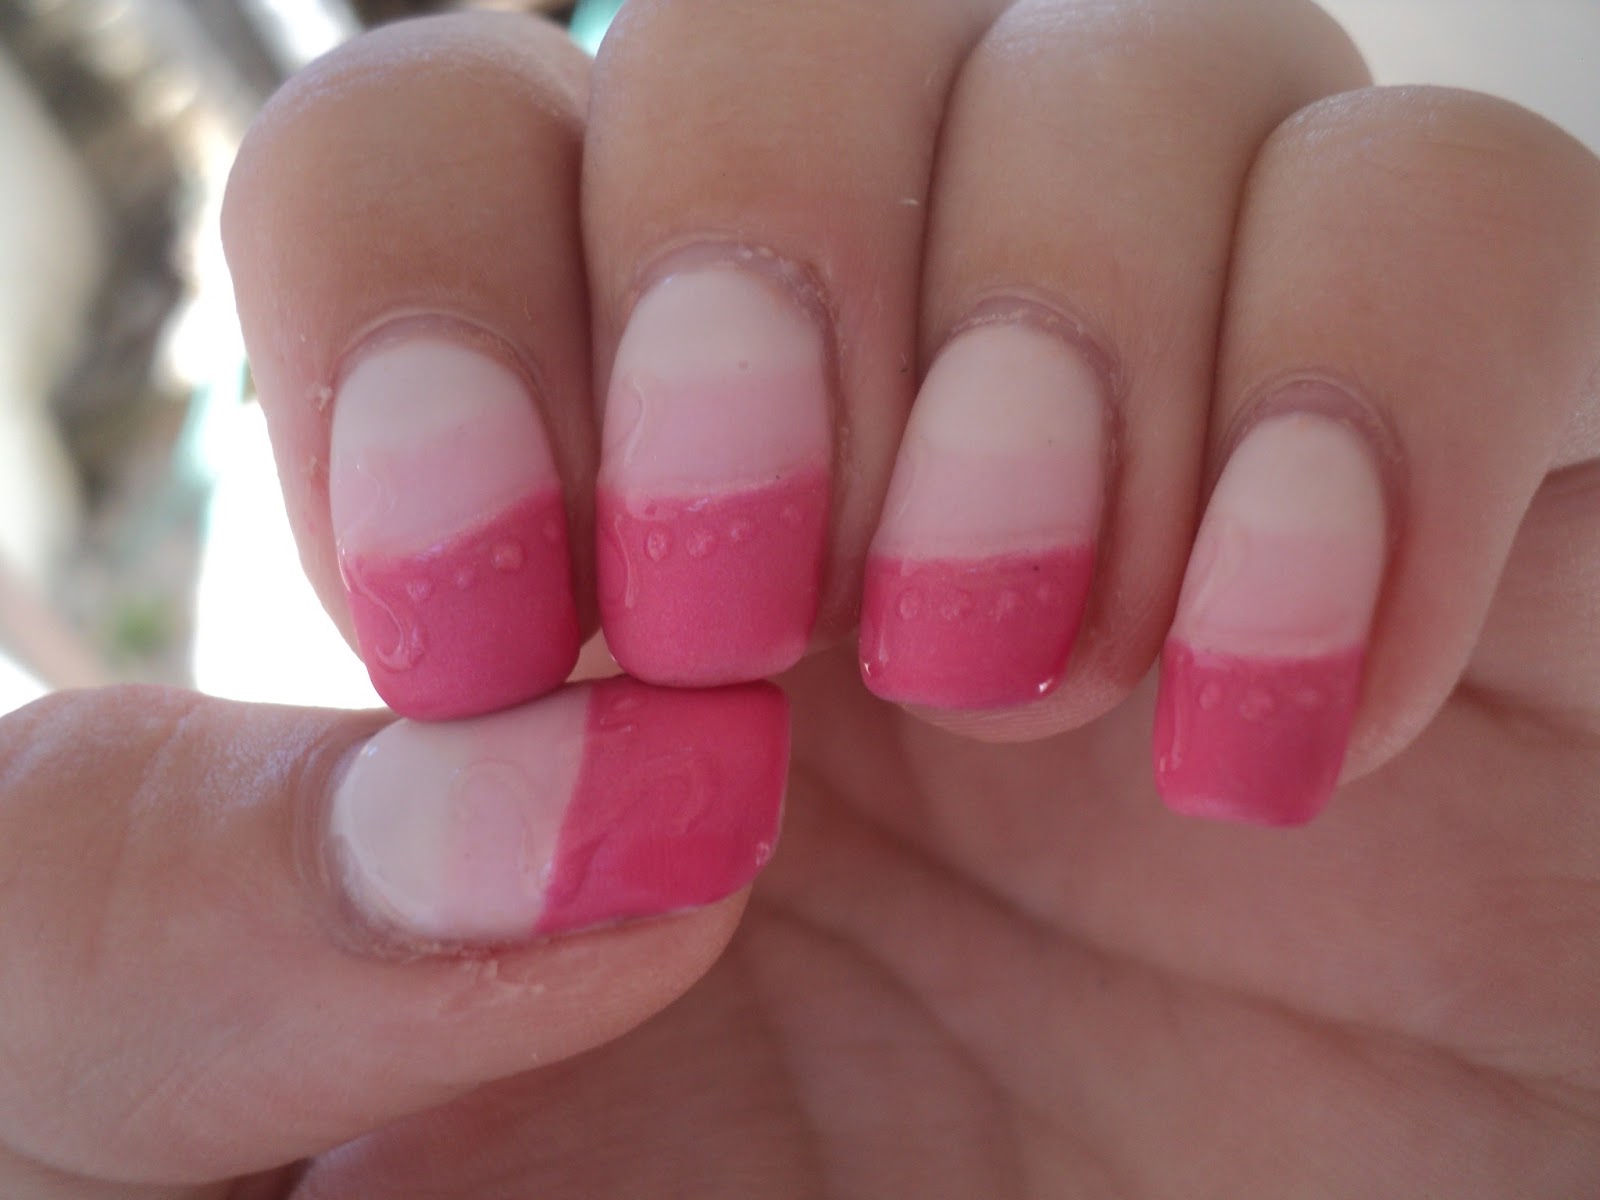
First up is Pretty ‘N Poppy.

One of the main reasons I love the Insta-Gel kit is that you get everything you need when you buy a new polish. You don’t need to constantly buy refill kits of the necessities which can be very pricey after a while. In every kit there are 16 nail strips, Gel cleansing wipes, Top coat, a nail file, and manicure stick. Sound familiar? It’s pretty much everything included in the original kit but the LED lamp!

I was very surprised with how easy they are to put on! With other Gel kits it can take forever to do each layer, but this was simple and fast! After some bad experiences with nail strips I half expected these to turn out horrible, but they turned out perfect!

In the light

Indoors

I love how shiny they are, and I love how easy it was to get a perfect design! I have spent hours before painting my nails with Gel polish so I was very happy with my results! On the box it says to put one coat of top coat, but for these pictures I put 2 coats. I like my nails a little thicker so that they don’t break so I added 2 more coats later on.

Next I decided to use the Amazing Lace Nail Strips. I absolutely love the way these ones turned out. They have a gold color for the base and a realistic black lace design on top.

Outside
Indoors

This is one design that I have been wanting to do for a long time! I have seen some simple lace designs that I thought might be easy enough, but I just don’t think I have the patience to do a free hand lace design without messing it up. So I was very excited when I saw this product.

Tips for using Sally Hansen Insta-Gel Strips

  • LIGHTLY buff your nails! You want to make sure you get the whole surface area of your nail, but if you are too rough or file too much you can ruin your nail.
  • Make sure to clean your nails with the cleanser, like I said earlier I like to do this twice to make sure they are clean.
  • Stretch the strips to the end of your nail and then file off. This way the strip is stuck to your nail. If it is not stuck to the tip of your nail it will peel off.
  • Make sure to keep the clear polish off the edges and cuticles of your fingers. If you get the polish on your skin it will cause lifting of your nails.
  • The clear coat is pretty thin so make sure you go slowly and take your time putting the clear coat on so that you don’t get any on your skin.
The only thing I did not LOVE in this kit, was the LED Lamp. While it worked great I do wish it was a little bigger. It did have it’s upside though, because of it’s shape it was very easy to hold and it is also very easy to travel with. Other LED Lamps can be big and bulky and hard to find room for.

I highly recommend this product to anyone looking for salon quality nail designs that you can do at home! I loved the way these nails turned out and I loved how easy they were to apply!

You can find Sally Hansen Insta-Gel Products on their website here, or at you local retailer!

What do you think of these products? Let us know in the comments below!

**Disclaimer** I was in no way paid, or obligated to give a positive review, or a review at all for this company. If you would like to read my full disclaimer for reviews you can find it here .

Share Button

Everything’s Better Sugar Coated! Nail Swatches and Review

One of the most popular nail trends recently has been textured nails. I have seen just about everything from furry nails, bumpy nails, nails with little balls glued to them, and of course matte nails. While some of them I are amazing, others (like furry nails) I still have not learned to love. I received some really awesome polish from Sally Hansen that they call Sugar Coat.
When I first heard of the textured polish craze I thought I would freak out if I had nails with texture! I hate it when there is a flaw in my nails, so the thought of every nail having “flaws” on them just did not seem like a fun idea. After trying them I realized that the pictures make the texture look a little more rough than they really are. I find textured polish to be tolerable and have started to like certain ones. I was pretty excited to try Sally Hansen’s Sugar Coat Line, and I am proud to tell you that they did not disappoint!
I was sent two colors to review for you guys: Cotton Candies and Bubble Plum. I think that the Cotton Candies color is my favorite of the two!
Bubble Plum and Cotton Candies with Cotton Candies bottle

Bubble Plum and Cotton Candies with Bubble Plum Bottle
They really do look like someone poured sugar into the bottle, but that are not sharp even though they look it. I was very surprised with how fast they dried! I was expecting this polish to take forever, but I was even able to paint my two year old’s nails with it! By the time she got up it was already dry! With most polish it ends up getting smeared or smudged because she doesn’t like to sit still long enough for it to dry. Mainly because she likes to go show them off!

In the light

Indoors
Because of my experience with the last Sally Hansen polish I thought that I was going to need at least 3 coats with this one, but to my surprise I only needed 2 coats and they were perfect! The polish glided surprisingly easy, and was the consistency of a slightly watery polish, but as it dried you could see the texture popping up.
For this review I just did a regular manicure because I was excited about my next review of the Sally Hansen Insta-Gel System, but next time you see these I will attempt at a texture color blocking design. I have see it done a couple times and I think they look pretty awesome! You can see what I’m talking about on the Pinterest post here. Be sure to follow us on Pinterest to see all of out designs, as well as all of the cool designs we find along the way!
If you have not tried a texture polish I highly suggest you do! I thought I would hate them, but it is one of those love/hate relationships. Not only that but the colors in this line are absolutely gorgeous!
You can find the Sugar Coat line on Sally Hansen’s Website here.
**Disclaimer** I was in no way paid, or obligated to give a positive review, or a review at all for this company. If you would like to read my full disclaimer for reviews you can find it here .
Share Button

Fall in love with Gem Crush Nails- Swatches and Review

I LOVE sparkles! Especially when it comes to my nails! I always find it hard to find the right polish color that has the right amount of sparkle. I finally found a polish that has tons of sparkle and also comes in lots of gorgeous colors!

This is Gem Crush by Sally Hansen. There are 8 full coverage glitter polishes in the collection and consist of two different shapes, sizes and colors. I was really impressed with how easy they were to apply! I hate glitter polish that takes 10 coats to get anywhere with and that doesn’t have very much dimension.

I received Glitz Gal and Be-Jeweled to review for you guys and I am happy to report that they are amazing! I decided to do all nails but my ring finger with Be-Jeweled and my ring finger has Glitz Gal for an accent. I don’t know why but I really like to have at least one thing different on my manicures!

Glitz Gal bottle

Be-Jeweled bottle

The bottle itself says to add 2 coats, but for these pictures I added 3 coats to get complete coverage on my nails. I was really impressed by how fast it dried considering how thick the polish itself was. The polish glides on really well for how thick it is! My nails are generally pretty flimsy so I like having polish that is a little thicker than normal. Just so that not only do my nails have a little extra cushion from breaks, but so that they are less likely to peel right off.

In the sun :)

Inside

Gem Crush is now my go-to glitter line, and I am very happy I was able to try them! If you get the chance I would highly recommend them to anyone who likes glitter, or looking for a full coverage, long lasting polish.

You can Find Sally Hansen and their Gem Crush Polish here.

Check out the ad for Gem Crush!

**Disclaimer** I was in no way paid, or obligated to give a positive review, or a review at all for this company. If you would like to read my full disclaimer for reviews you can find it here .
Share Button

Matte Gel Nails Tutorial

So you all know of my Senstionail obsession, if not you do now! Anyway, for the longest time I have wanted to try a matte finish nail polish but did not want to give up on my Sensationail nails. So I have solved this problem by figuring out how to get a matte finish using one Sensationail products!
So this is the design I chose. I also added some clear polish on the top to create a cool design. But enough of that, lets get to the good stuff! Here is my tutorial:
To elaborate a little further, in case the picture above is a little confusing.
Step 1: paint your nails like you would normally. You can choose any design or any color you would like and it’s not the color that produces the matte finish. I decided to do a pink gradient.
Step 2: Make sure to add an extra coat of clear. We do this because you don’t want to lose any of your color when doing step 3.
Step 3: Take the softer end of a nail file and gently buff your entire nail. You don’t want any shine showing otherwise you will lose the matte effect. Make sure you cleanse your nail with the gel cleaner afterwords.
Step 4: If you would like you can add a design on top of your nail like I did to create a 2 dimensional look. All you do is take your clear coat either using a toothpick or any other nail tool you would like and draw your design. You could also just paint the tips for a french manicure look. Remove the tacky layer with your gel cleanser and viola! You have a Matte Gel Nail Design !
Let us know if you tried this and be sure to post pictures letting us know your results! We love seeing new designs!
Share Button

Keep your hands soft and your dishes clean with Palmolive Soft Touch Dish Soap

I was so excited to learn that I had finally gotten accepted into a new Influenster program. luckily for me, this program was for Palmolive Soft Touch Dish Soap. the reason I say I was lucky was because we had just run out of our large bottle of regular Palmolive Dish Soap that we got from Costco.
I have always been a fan of Palmolive. Ever since I was a teenager I have been obsessed with the smell and the quality of it. My family was always a fan of dawn, but I hated the plain scents and plain bottle designs. My first experience with Palmolive was in a hotel on one of my family vacations. The hotel had given us a travel bottle to use during our stay and I begged for more and told them that I didn’t want to do anymore dishes without it. I would have to say that this is what began my obsessions of Palmolive.

The one thing that I have always hated about the regular Palmolive is that it can really dry your hands out. I love doing my nails, so I hate having my nails look great my my hands look like death. As a mommy of two little girls and a husband that eats like a horse I always have dishes that need to be done. Because of this my manicures get ruined and I have to start all over. I use Sensationail’s Gel Polish that lasts longer than regular nail polish but takes some time (that I don’t have) to do them, so when they get ruined I get more than a little upset. With Palmolive Soft Touch I no longer have to worry about my manicure!

I received two bottles of Palmolive Soft Touch; Vitamin E (the pink bottle) and Coconut Butter (the beige color). My favorite is the Vitamin E! It smells amazing and leaves my hands super soft! I’m not a big fan of coconut, but the Coconut Butter soap does smell great and also leaves my hands soft. My biggest problem as of recently is that my 2 year old loves to “help” me do dishes and she has used most of the Vitamin E because she thinks that if something is pink it belongs to her. I’m just glad that she can use this soap and not hurt her baby soft skin!

Baby H with her new favorite soap
Helping do the dishes

Overall I would recommend this soap to anyone that has to wash their dishes by hand. It cleans dirt and grime with ease all while keeping your hands soft. You can find Palmolive at a Walmart near you!

Thank you again Influenster for letting me try this amazing product! You guys always know about the best things out there!
**Disclaimer** I received two bottles of Palmolive Soft Touch from Influenster to review. However, I was in no way paid, or obligated to give a positive review, or a review at all for this company. If you would like to read my full disclaimer for reviews you can find it here .
Share Button

SensatioNail Review, Tips and Nail Art

If you have been following this blog for a while you know that nail polish is not my nails best friend. I have a very hard time finding nail polish that will actually stay on my nails without magic. I recently found that magic in SensatioNail’s Invincible Gel Polish. I was able to get a couple really great colors, and even their starter kit to review for you guys.

Let’s start with SensatioNail’s Starter Kit. The Starter Kit comes with a Pro 3060 LED Lamp, Gel Cleanser, Gel Primer, Gel Base and Top Coat, Nail Buffer, Manicure Stick, Lint-Free Wipes, and either Scarlett Red or Raspberry Wine Gel Polish. It comes with enough supplies to complete at least 10 manicures, and each manicure lasts up to 2 weeks! In order to use any gel polish you need the LED Lamp so I was glad I was able to receive this set. My set came with Raspberry Wine Gel Polish which is a really pretty shimmery red. I’m normally not a big fan of red, but with this color and with it being the holidays I have really enjoyed having it.
The LED Lamp is very small. While I do love that it is small, I do think that it is a little too small. Because of the angle of my thumb when placed with my other fingers I have to cure my thumbnail separately from my other nails because sometimes it doesn’t completely cure. I also wish that the lamp was battery operated so that I could carry it around with me and not be tethered to a wall. Others that have a specific place to do their nails, or even a desk I’m sure would benefit from this and if you don’t like the expense of batteries this would also be good for you. Other than that the lamp works great! Regular UV lamps take double the amount of time to cure, so I love how fast this system works. It cures quickly and is not bulky so it’s easy to store. So if you’re like me and don’t have much room for nail products it’s size is a real life saver.
The Gel Cleanser and Gel Primer are great and I think one of the main reasons that this kit works so well for me. They help make sure that your nails are clean and that the polish will stick to your nails. They really help keep this kit simple and easy to use.
While they may not have many colors the colors they do have are wonderful! I am surprised every time I use them! They are extremely vibrant and shiny. The shine lasts the whole time, and doesn’t seem to wear off like other polish. It helps me want to keep my nail polish on for as long as possible so I don’t waste the shine.

After using this kit along with other SensatioNail polish, I have come across a couple tips that I think you should know about.

  1. Make sure to follow the directions carefully. If you miss a step it could either ruin your manicure or it could last a lot less time.
  2. Make sure to avoid your skin. If you you get the polish on your skin it could make your polish peel off. If you accidentally get polish on your skin make sure to wipe it off with a clean cloth or acetone before curing that layer of polish.
  3. Always cap your nails. I personally only cap them twice (once with the first layer of color, and once with the top coat) because I don’t want the ends to be too thick.
  4. If you are having trouble keeping the polish on your nails try soaking your nails in a mixture of vinegar and water for 5-10 minutes to help dry out your nails. This will help the polish stick to your nails so your manicure can last longer. Make sure to put lotion on after you are finished with your manicure so that your hands do not dry out in the process.
  5. Is your manicure still in tact at the two week mark and you love the color, but you hate that your natural nail is starting to show? You can fill your manicure by buffing both your natural nail and your SensatioNail manicure and painting your natural nail with the color you already used, and putting a new clear coat on. That way you don’t have to waste your favorite color!
  6. Oops! Did one of your nails break? Not a problem! You can fix a crack in your nails by creating your SensatioNail manicure over your broken nail. I had this problem and prolonged the life of my broken nail for over a week before I had to say goodbye.
I was able to create many different manicures with a small amount of colors. One of the perks of using gel nail polish is that you do everything layer by layer, and it won’t dry until you cure it. So if you mess up on your design and you want to start over just wipe it off and start again. You can see some of the manicures I have created so far with SensatioNail below!
Colors used: Gold Glitter and Color set (midnight Rendezvous for the base and Gold Glitter) , and Raspberry Wine.

Colors used: Gold Glitter and Color set (Gold Glitter for the base and Midnight Rendevzous for the bow outline) , and Raspberry Wine

Color used: Magnetic Tantalize

Colors used: Rasperry wine for the base and Glitter and Color Duo (Midnight Rendezvous and Gold Glitter)
Day 5 and still beautiful! Colors used: Glitter and Color Duo ( Midnight Rondezvous for the base and Gold Glitter)

The more manicures I did the better they turned out, and the longer they stayed on. If you are one that has a hard time keeping your nail polish clean you may not get perfect results on the first try. Not all manicures will last 2 weeks, but even so they will last longer than traditional polish and will look much better and will keep your nails strong! I am very happy with this polish and have already added to my collection. Stay Tuned to see more manicures created with SensatioNail!

I wasn’t able to snag a giveaway for this product, but make sure to like their Facebook page here to find lots of deals and giveaways. They just did a Fan Appreciation Giveaway of 3,000 bottles of their gel polish!! I love hanging around their Facebook page to find out tips, and just to see what manicures have been created using SensatioNail. Also make sure to check out their website for their latest products here!

Have you used SensatioNail? Let us know what you think in the comments below!

Happy Holidays!

**Disclaimer** I was in no way paid, or obligated to give a positive review, or a review at all for this company. If you would like to read my full disclaimer for reviews you can find it here .

Share Button

Paul & Joe Review

Who is Paul & Joe made for?
“Women who are totally self aware and fueled by an inner confidence. Women who are brimming with so much determination to enjoy life that they may seem a little hedonistic. She is savvy, stylish, and not afraid to address her needs and desired. Women who have these qualities, and at the same time project charm, passion, and compassion. These are the women Paul & Joe is made for.”
Does this sound like you, or someone you know? If so then I have something really cool to share with you.
When you look at all the Paul & Joe products you can’t help but think about how cute they are. To me Paul & Joe products are adult beauty products in kids packaging. Before you think that this is a bad thing, please reconsider. Their products may have all the fun qualities of children’s play makeup such as fun colors, and fun packaging, but they have the quality of some of the most expensive cosmetics without the price tag. I was able to receive a sample of their nail polish as well as their lip gloss from their summer 2012 cosmetics line.
Before I share with you my findings on these products I wanted to tell you why I was beyond excited to review them The summer 2012 line is inspired by Shakespeare’s play “A Midsummer Night’s Dream.” So this lines colors are made to remind you of everything that has to do with my favorite thing, fairies! I could not wait to get this collection into my hands!
The first product that I am going to talk about is the “Fairie Kisses” Lip gloss. At first I was terrified of using this product. Remember when I said that the colors and designs reminded me of children’s makeup? This lip gloss is the man reason I said that. Not only is the lip gloss in a tube that a child would love, which mine does, but the lip gloss itself is green. Green is one of my least favorite colors, and definitely not a color I would choose for my lips, but I decided to try it anyway.

I was very surprised with this product. What I thought would be a horrible experience ended up being amazing. The lip gloss not only went on clear, but stayed on for a very long time. It was not overly sticky and did not make my lips feel weird or dry out when it wore off. In fact, it actually plumped and even conditioned my lips. I could not believe how amazing my lips looked and felt with this lip gloss on. It must have been the added pixie-dust!
My favorite of the two that I received was the “Pixie” nail polish. Pixie is a very sparkly silver based nail polish that when in the light comes to life by showing its many sparkling colors. While I generally love silver, I don’t normally wear it for long because the color either fades or the silver just becomes boring. I don’t think Pixie will ever becomes boring or will ever lose its shine!
This nail polish glides on like no other nail polish I have used. With most glittery nail polish it either takes a few tries to lay flat or will leave a lot of bumps on the surface from the glitter itself. I did not come across either problem when applying this nail polish. I only have to use 2 coats to get an amazing layer of color over my nails.
One thing I have always struggled with when it comes to nail polish is getting it to stay on my nails. Nail polish will literally peel right off in a matter of minutes, even acrylics will start to lift off of my nails on the first day. I am proud to report to you that this nail polish did not lift, peel, or even lose its perfect shine for over a week. I was so excited that I finally found a polish that not only looks great but that actually stays on my nails too. I will definitely be buying more of this nail polish, along with other colors in the very near future!
You can find these and other great Paul & Joe products here.

**Disclaimer** I was in no way paid, or obligated to give a positive review, or a review at all for this company. If you would like to read my full disclaimer for reviews you can find it here.

Share Button